Dreamweaver includes easy-to-use tools for the following:
Page layout and design with HTML/XHTML (Extensible Hypertext Markup Language)
and CSS (Cascading Style Sheets)
Adding images and multimedia files to Web pages
Creating interactivity with built-in JavaScript behaviors
Building page templates for creating pages with the same design theme and elements
Checking browser compatibility as you create Web pages
Managing your Web site
Uploading and downloading Web site files from your computer to a Web server
Creating database connections and data-driven Web pages
TIP
You can customize Dreamweaver to meet your needs. In addition to an extensive
Preferences menu where you can choose a variety of options for how the program
works, if you know JavaScript or XML, you can change basic features of the program,
including its appearance and available options.
The new Document toolbar combines features that were previously scattered throughout
the Dreamweaver workspace. Most of Dreamweaver's essential tools are now available
to you via the Document toolbar.
TIP
We'll explore all the features of the Dreamweaver interface and tools later
in this lesson.
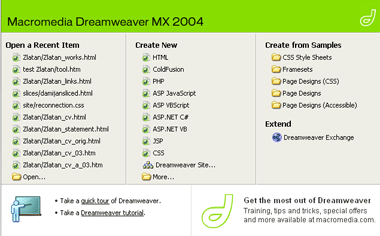
The Start page, shown in Figure 1-1, includes options to open recent documents, create new documents, use Dreamweaver's sample files, access to Help, and connect to the Dreamweaver Exchange on the Macromedia Web site. The Start page automatically displays when you open Dreamweaver and any time there's not a file open in the Document window.

Figure 1-1: The Start page, introduced in Dreamweaver MX 2004.
View a larger version of this image.
Dreamweaver now offers multiple Insert bars in place of the single Insert bar
of Dreamweaver MX. This makes the workspace much less cluttered and efficient.
A new Favorites Insert bar allows you to add the features you use most often
to your own customized Insert bar.
A new table layout mode, Expanded Tables mode, has been added to the previous
two modes (Standard and Layout) for improved table editing. You'll learn about
creating tables in Lesson 3.
You can now connect to a Web server, download files, make changes, and upload
files -- all without creating a Dreamweaver site. However, you still need to
create a Dreamweaver site if you want to use Dreamweaver's extensive collection
of site management tools. You'll find out about using Dreamweaver for site management
in Lesson 6.
Dreamweaver has added several new CSS features, including text styles, page
properties, Code Hints, sample pages, and two new CSS panels. You'll learn more
about using CSS in Dreamweaver in Lesson 4.
You can now copy and paste Microsoft Word and Excel documents directly into
Dreamweaver and preserve Word and Excel formatting.
Dreamweaver's new image-editing features allow you to do basic image editing
directly in Dreamweaver. You can crop, resize, resample, sharpen, and change
brightness and contrast. Using images in Dreamweaver is covered in Lesson 5
Tour the Dreamweaver Workspace Page 3 of 5
Dreamweaver MX 2004 includes an integrated workspace for Microsoft Windows and
a floating workspace for Mac OS X. Windows users also have the option of a Designer
or a Coder workspace layout, as shown in Figure 1-2. You can change this at
any time in the General category of the Preferences window (Edit > Preferences
> General). The Designer workspace opens pages in Design view by default
and has panels on the right. The Coder workspace opens pages in Code view by
default and has panels on the left.
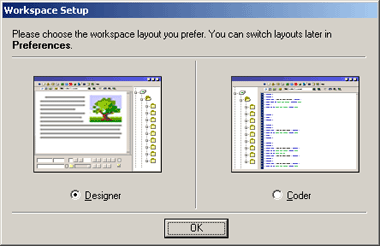
Figure 1-2: Choosing a Dreamweaver workspace.
The workspace includes a main application menu, Insert bars, a Document window, and an assortment of panels. We'll take a closer look at Dreamweaver's Insert bars and panels in the following section of this lesson.
The main application menu bar, shown in Figure 1-3, includes the following menus:
![]()
Figure 1-3: Dreamweaver menus.
File: Open and save files
Edit: Copy and paste, find and replace, and set preferences
View: Document view preferences, as well as visual aids and layout tools
Insert: Images, media, layout objects, tables, forms, and links
TIP
Dreamweaver's Insert bars include all the options of the Insert menu in a visual
interface.
Modify: Change properties of the page or any objects on the page
Text: Text formatting options
Commands: Additions to the basic Dreamweaver program, such as Web photo albums
Site: Site management and editing
Window: Open and close panels
Help: Tutorials and help documents
Many of these menu options are also available to you via the Insert bars.
Dreamweaver displays files in the Document window, directly below the main application menu bar. In Windows, when the Document window is maximized, files appear in a tabbed interface, as shown in Figure 1-4, so that you can quickly switch from one open document to another.
![]()
Figure 1-4: Dreamweaver MX 2004 Document window with tabbed interface and Document toolbar.
View a larger version of this image.
Figure 1-4 also shows the new Document toolbar. This toolbar lets you access the tools that you're likely to use most often, and all from one convenient location at the top of the Document window. From left to right, these tools include:
View options: Code, Split, or Design. Figure 1-5 shows a page in Split view, with Code view on the top and Design view on the bottom. You can make either window larger by moving the divider bar in between the two windows.
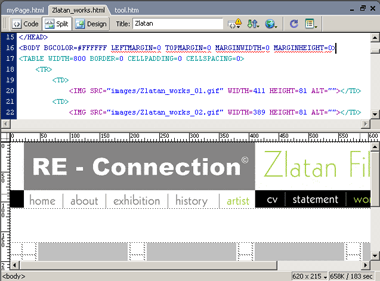
Figure 1-5: Viewing a page in Split view with Code view on the top and Design view on the bottom.
View a larger version of this image.
Document title: Title that appears in the browser title bar when the page is
viewed in a browser.
Browser check: Check the file for any incompatibilities in your selected target
browsers; click the arrow to select options for this tool.
File management options: Upload and download files from a Web server.
Preview in browser: Preview pages in your selected browsers.
Refresh Design view: Refresh the page after changes in Design view.
View options: Additional viewing choices for both Code and Design views.
Work with Panels Page 4 of 5
The other major part of the Dreamweaver interface is the panels, shown in the
far right of Figure 1-6. Dreamweaver includes several groups that contain panels
with access to additional tools. You can change the panel groups and make new
combinations of panels to suit your work patterns. To open a panel group, click
the arrow on the left. You can access additional options for an open panel by
clicking the Options menu on the right of the panel group to view the context
menu.
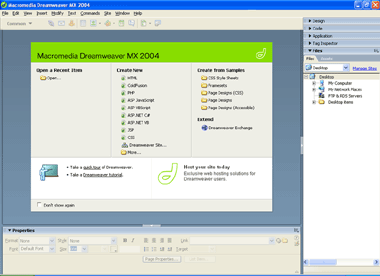
Figure 1-6: Panels in Dreamweaver.
View a larger version of this image.
TIP
If you don't see the panel you need in the workspace, open the panel by choosing
it from Window menu.
By default, the following panel groups are in the Workspace -- most panel groups are on the right or left side on a PC, or wherever you place them in the Mac floating workspace. The various panel options are discussed in the following sections.
Files Panel Group
The Files panel group includes the Files and the Assets panels. An open Files panel is shown in Figure 1-7. You can access all the files for any Dreamweaver site via this panel. The Files panel also includes a Files toolbar with additional files options. The Assets panel offers easy access to images, media files, library items, and scripts for the site.
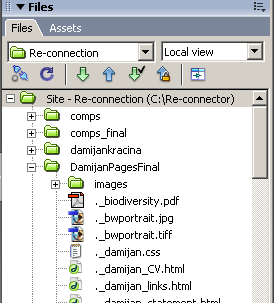
Figure 1-7: The Files panel.
Design Panel Group
The Design panel group includes the CSS Styles and the Layers panels. The CSS Styles panel displays any style rules in the current document. You can create new styles or edit existing styles from this panel. (You'll learn how to do this in Lesson 4.) The Layer panel displays details about any layers in the current document.
Code Panel Group
The Code panel group includes the Code and the Reference panels. The Code panel contains snippets of code that you can add to your documents. The Reference panel offers quick access to reference texts on HTML, CSS, and server technologies supported in Dreamweaver, for example, ASP (Active Server Pages).
Tag Inspector Panel Group
The Tag Inspector panel group contains the Attributes, Behaviors, and Relevant CSS panels. The Attributes panel displays any attributes in the current document. The two icons at the top of the panel allow you to view attributes in categories or in an alphabetical list. You can access Dreamweaver's built-in JavaScript behaviors via the Behaviors panel. We'll explore Behaviors in Lesson 5. The Relevant CSS panel shows all the style rules in the current document, and lets you easily add new features or make changes to existing styles.
Applications Panel Group
The Applications panel group includes the Databases, Binding, Server Behaviors, and Components panels. These panels include advanced features used for connecting to databases and creating data-driven Web applications. These advanced features are not covered in this introductory course, but if you're interested, you can find out more about them in the Dreamweaver tutorials and Help documents.
Properties Panel
The Properties panel, sometimes referred to as the Properties inspector, opens at the bottom of the Dreamweaver workspace, as shown in Figure 1-6, below the Document window. This is the panel you'll use most often in Dreamweaver because it shows all properties of the currently selected item in a document, and lets you add and change properties. The appearance of this panel changes depending on the selected item. Figure 1-8 shows the Properties inspector for a selected Flash file.

Figure 1-8: The Properties inspector for a Flash file.
View a larger version of this image.
Result Panel Group
The Results panel group, shown in Figure 1-9, also opens at the bottom of the Dreamweaver workspace. If it's not open, you can choose Window > Results.

Figure 1-9: The Results panel.
View a larger version of this image.
Most of these panels are used to create and display reports on various site operations. The Results panel includes the following panels:
Search: Displays results for Find and Replace operations.
Validation: Displays errors and warnings about validating the code in the current
document.
Target Browser Check: Displays incompatibilities in the current document for
your selected target browsers.
Link Checker: Displays any broken links in the current document or site.
Site Reports: Displays the site test results.
FTP Log: Displays exactly which files were transferred to and from the Web server.
Server Debug: Debugs ColdFusion files.
Use Insert Bars Page 5 of 5
Dreamweaver's collection of Insert bars provides easy access to Dreamweaver
tools via a visual interface. The Insert bar displays right below the main application
menu, as shown in Figure 1-6, although it's not active in this figure. If the
Insert bar isn't visible, choose Window > Insert to display it in your Dreamweaver
workspace.
To access the tools, just select the arrow and choose which category of tools you wish to access. Some items in the different categories include additional selections -- if you see an arrow next to an icon, click it to view additional choices.
Dreamweaver MX 2004 includes eight categories in the Insert bar:
Common Insert bar: Includes the most common elements that you'll add to your pages, including links, images, and media files. Figure 1-10 shows the Common Insert bar.
![]()
Figure 1-10: The Common Insert bar.
Layout Insert bar: Includes choices for laying out your page with tables and/or
layers. Tables are covered in Lesson 3.
Forms Insert bar: Lets you add forms and form elements to your pages. Forms
are covered in Lesson 5.
Text Insert bar: Used to format text and add special characters.
HTML Insert bar: Contains icons for common HTML objects such as horizontal rules,
tables, and frames.
Application Insert bar: Includes options for any server objects used in the
current document. The objects change depending on the server technology you're
using in the current document.
Dreamweaver supports five server technologies: ASP, ASP.NET, ColdFusion, JSP
(Java Server Pages), and PHP (PHP Hypertext Preprocessor).
Flash Elements Insert bar: New to Dreamweaver MX 2004. They're prebuilt Flash
components that you can add to your Dreamweaver pages to create RIAs (Rich Internet
Applications). RIAs are a new type of Internet application that feature more-interactive
and more user-responsive interfaces.
Favorites Insert bar: Also new to Dreamweaver MX 2004, lets you create your
own group of favorite objects for easy insertion into Dreamweaver pages. To
add an item to the Favorites Insert bar, right-click (Ctrl + click Mac symbol)
any icon in an Insert bar and select Customize Favorites. This opens the Customize
Favorite Objects dialog box where you can add and delete items from the Favorites
Insert bar.
Moving On
We've covered a lot of material in this lesson. Dreamweaver is a features-rich program with a wide variety of tools, and every new version adds even more new items. Remember that you can choose which features of Dreamweaver you want to use to create Web pages. Likely, you'll have your own group of favorite objects and tools. You'll be learning much more about the most useful Dreamweaver features and tools in following lessons. In Lesson 2, you'll learn about working with text in Dreamweaver.
Before you move on, don't forget to do the assignment and the quiz for this
lesson. In addition, visit the Message Board to find out what your fellow students
and instructor are up to.