
Set Page Properties
Dreamweaver MX 2004 gives you even more control over Web page text than any
previous version. The new Page Properties dialog box gives you easy access to
the appearance of all text on the page, including headings, links, and lists.
To set page properties, create a new HTML page (File > New or choose HTML from the Create New list on the Start page). Next, choose Modify > Page Properties from the main Dreamweaver menu bar. The Page Properties dialog box opens. This dialog box includes options for five categories of properties, as discussed in the following sections.
The screenshots in this course were taken on a machine running Microsoft Windows XP using the Microsoft Windows Classic style. If you're using Windows XP default style on your computer, your screenshots may look a little different.
Appearance
In the Appearance pane, shown in Figure 2-1, you can select all the basic text properties, including:

Figure 2-1: Appearance pane.
View a larger version of this image.
Page font: Choose from Dreamweaver's selection of font families or choose Edit
Font List from the drop-down menu to add additional font choices.
Bold and/or Italic: Click the B or I buttons to apply bold or italic formatting
to all of the page text.
Size: Select a text size in points, or choose a relative value such as small.
Text color: Click the box to open Dreamweaver's color picker and select a color
for the text on the page.
Background color: Click the box to choose a background color for the page from
the color picker.
Background image: Click the Browse button to browse to the location of the image
file on your hard drive or enter the path and file name in the box.
Margins: Set page margins for left, right, top, and/or bottom margins by entering
a value and choosing a unit of measurement from the drop-down menu.
Links
From the Links pane, shown in Figure 2-2, choose a font, text size, and color for the page links.
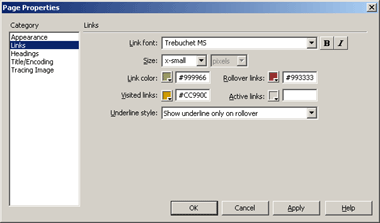
Figure 2-2: Links pane.
View a larger version of this image.
Most browsers use blue for links and purple for visited links. You can choose a different color for the following types of links:
Links: Color before the link is clicked
Rollover links: Color when the user moves over the link
Visited links: Color after the link is clicked
Active links: Color when the link is clicked (changes to visited link color
after)
You can also choose whether links are underlined and whether the underlines
are visible when users move their pointers over the links.
TIP
If you decide not to underline links, make sure that it's obvious from the rest
of the page context that they're links -- most viewers expect to see those underlines!
Headings
Use the Headings pane, shown in Figure 2-3, to choose styles for the headings on your page. Headings are bold formatted by default, and have default sizes that range from H1 (largest) to H6 (smallest).
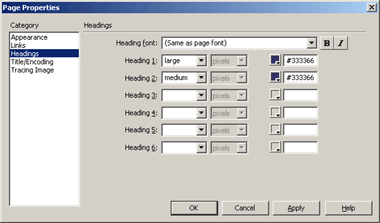
Figure 2-3: Headings pane.
View a larger version of this image.
You can choose a font, text size, and color for headings. Figure 2-4 shows an example of the six heading sizes.
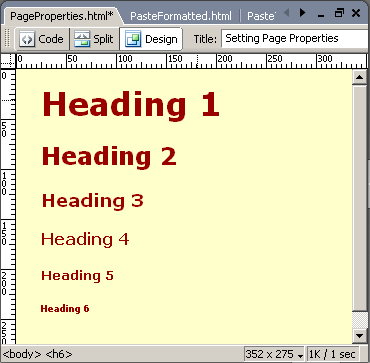
Figure 2-4: Heading types.
Title/Encoding
You can enter a title for your page in the Title/Encoding pane, shown in Figure 2-5. The default encoding is Western European, but if you're coding for an international audience, you can choose another type of document encoding from the drop-down menu.
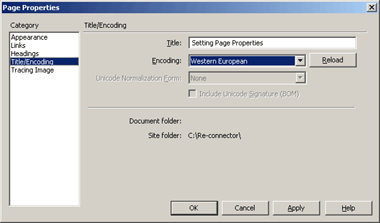
Figure 2-5: Title/Encoding pane.
View a larger version of this image.
Dreamweaver MX 2004 also supports Unicode, so if your document needs to be in Unicode format, choose Unicode from the Encoding menu, and then the additional Unicode options display in this pane.
TIP
See the Unicode home page for more information on Unicode documents at www.unicode.org.
Tracing Image
Use the Tracing Image pane, shown in Figure 2-6, to include a tracing image in your page background. Click the button to browse to an image file on your hard drive, and choose an opacity level with the slider bar. The tracing image displays when you're working on the page and helps you arrange page elements in specific locations, but doesn't display in the browser. To select additional options for a tracing image, choose View > Tracing Image to display these choices.
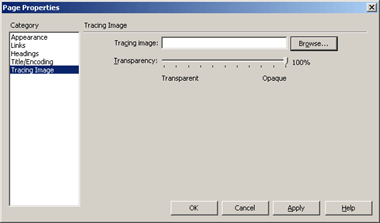
Figure 2-6: Tracing Image pane.
View a larger version of this image.
After you've selected your page formatting options, click OK, and then save the page (File > Save). When you enter text on the page, it will automatically display with your choices for background and text formatting. If you open the CSS Styles panel, as shown in Figure 2-7, you'll see that Dreamweaver has automatically created styles for your text formatting choices. You'll learn more about CSS styles in Lesson 4.

Figure 2-7: Dreamweaver automatically creates CSS styles from your page property
choices.
Choose Fonts Page 2 of 5
When you choose a font family, make sure that you choose from the standard font
families that are included on most computers, such as Times, Arial, Helvetica,
or Verdana. If you choose a font that users may not have installed on their
computers, your text will display in the default font for their browsers.
You can choose either a serif (type characters include additional small decorative lines) font, such as Times, or a sans-serif font, such as Arial.
TIP
Verdana is a sans-serif font that was designed specifically for use on the screen,
and is installed on most computers.
Unordered List: Display with a preceding bullet
Ordered List: Display with a preceding number
Definition List: Include a term and an indented definition
Figure 2-8 shows examples of each of these list formats.
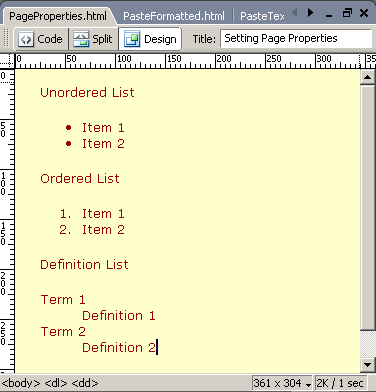
Figure 2-8: List formats.
Use Microsoft Word Documents in Dreamweaver Page 4 of 5
Dreamweaver MX 2004 includes new features for preserving Word formatting in
a Dreamweaver document. You can import a Word document directly into a Dreamweaver
page, or copy and paste from a Word document to your Dreamweaver file. All three
of these options produce different results, however.
Figure 2-9 shows an original Word document that includes formatting for 11 point bold Verdana for the header, a bulleted list format, and regular 10 point Verdana for the list items.
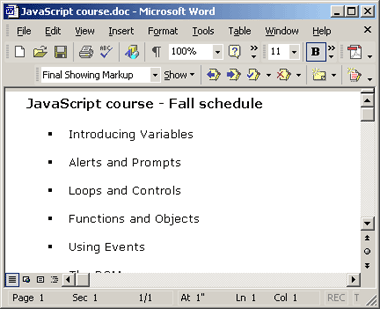
Figure 2-9: Our original document in Word.
To import this document directly to Dreamweaver, open a new HTML page in Dreamweaver, and then choose File > Import > Word Document. Dreamweaver pastes the page into your open HTML document. Figure 2-10 shows the imported page in Dreamweaver. The header is in bold, and Dreamweaver has inserted an unordered list to display the list items, but the text is formatted in the default font and includes extra space between the list items. You can reformat the text in Dreamweaver to resemble the original document, but it would probably be just as easy to create this short document in Dreamweaver itself.

Figure 2-10: Importing a Word document.
You can also copy and paste Word text into a Dreamweaver document. Open your Word document, select the text, and copy it. Open Dreamweaver and paste your selection into an open HTML page. You have two choices for pasting the text. You can paste the text formatted (Edit > Paste Formatted), as shown in Figure 2-11, or paste it as plain text (Edit > Paste Text).
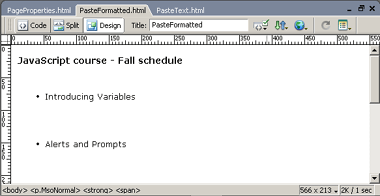
Figure 2-11: Pasting Word formatted text.
As you can see in Figure 2-11, when you paste Word formatted text, Dreamweaver preserves Word formatting styles and closely approximates the appearance of the original Word document. You can apply the Dreamweaver command (Commands > Clean Up Word HTML) to make your document, shown in Figure 2-12, even more closely resemble your original Word document.
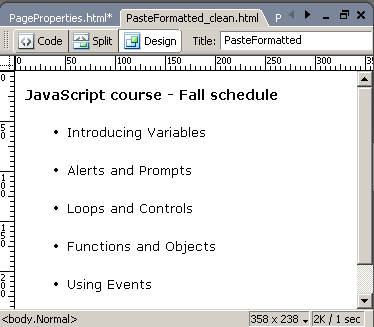
Figure 2-12: Word formatted text after using the Clean Up Word HTML command.
Figure 2-13 shows an HTML page after pasting a Word document without formatting or (Edit > Paste Text). Dreamweaver has inserted a character to approximate the appearance of a list, but the text in this case is not actually formatted as a list.
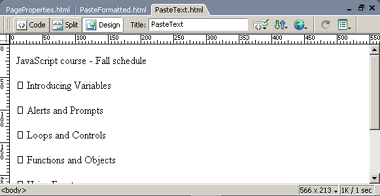
Figure 2-13: Pasting Word text without Word formatting.
TIP
Choose Edit > Paste Formatted, and then Commands > Clean Up Word HTML
for the closest approximation to the original look of your Word document.
Use Microsoft Excel Documents in Dreamweaver Page 5 of 5
You can also import an Excel document into Dreamweaver MX 2004. Dreamweaver
creates a table to approximate the appearance of the Excel document. Figure
2-14 shows an original Excel document.
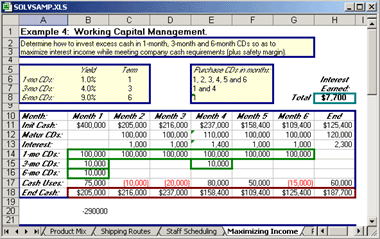
Figure 2-14: Our original document in Excel.
View a larger version of this image.
When you import this document to Dreamweaver, as shown in Figure 2-15, most of the Excel formatting is lost, but Dreamweaver displays the Excel data in a table. You can add additional formatting in Dreamweaver to make the document appear closer to the original.
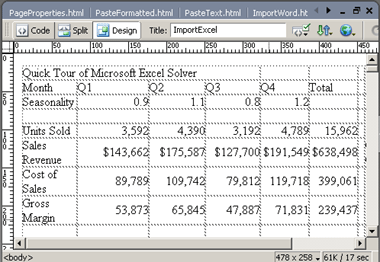
Figure 2-15: Importing an Excel document.
Moving On
In this lesson, you learned how to set page properties in Dreamweaver, including background and text formatting properties. You also learned how to import Word and Excel documents.
In Lesson 3, you'll learn how to create and use tables in Dreamweaver.