Creating Styles and Style Sheets
Your first decision in using styles is to decide whether to make a style for one page (embedded style) or to create external style sheets that can be used for as many pages as you choose.
Let's start by creating a style for one page:
Create a new HTML page in Dreamweaver (File > New or choose HTML from the
Create New menu on the Start page).
Type a sentence of text on the page. Select the text and then choose Text >
Paragraph Format > Paragraph in the main Dreamweaver application window.
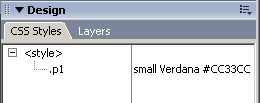
Open the CSS Styles panel, shown in Figure 4-1. The CSS Styles panel is part
of the Design panel group. Choose Window > CSS Styles if it's not visible.
Figure 4-1: The CSS Styles tab.
Click the New CSS Style icon (a small + symbol on a rectangle) at the bottom of the panel to create a new style. The New CSS Style window opens, as shown in Figure 4-2.
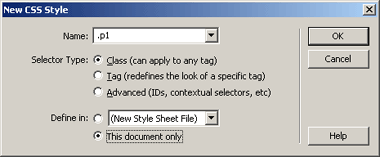
Figure 4-2: The New CSS Style window.
Type .p1 in the text box at the top of the window. Don't forget the period
before the name.
Class is selected by default in the Selector Type menu. You're going to create
a new class, so leave this button selected.
Choose This document only from the Define in radio button menu.
Click OK.
The CSS Style definition window, shown in Figure 4-3, opens. This is where you
define your new style.
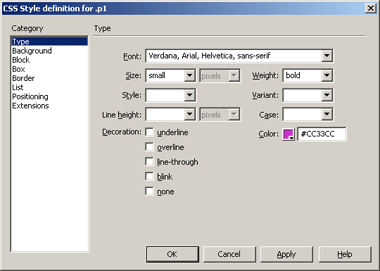
Figure 4-3: The CSS Style Definition window.
View a larger version of this image.
From the first category in the window, which is Type, choose a font, a size,
and a color for your style.
Click OK to save your style.
You can now apply the new style to the selected text by opening the Properties
inspector and selecting .p1 from the Style drop-down menu, or you can right-click
the style definition in the CSS Styles panel and choose Apply from the pop-up
menu.
The Style drop-down menu in the Properties inspector displays style names in
the format of the style, for example, the .p1 style name is displayed in small
purple Verdana text. This can be very useful when you have multiple styles available
from which to choose.
Your text should now display in the selected style.
As you can see in Figure 4-3, there are multiple categories for defining styles.
You can use one category for a given style, or as many as you want. The categories
include:
Text: Text styles include all the text formatting covered in Lesson 2, plus
some additional options. You can select a font, a font size, a font weight,
a font style (normal, italic, or oblique), a font variant (small caps), a line
height (distance between lines of text), the text case, the text color, and/or
the text decoration features such as underlining.
Background: Background features include background color, background image,
whether and how the background image repeats, background image attachment, and
background image position.
Block: The block category includes additional text features such as word spacing,
letter spacing, alignment, indenting, white space formatting, and display options.
Box: The box category includes features for the placement and display of page
elements such as width, height, margins, and padding.
Border: Border features include width, color, and specific border styles. You
can choose a border style for just one border, for example, the top border,
or for all four borders of an element.
List: List options include specific styles for list item bullets and numbers
and also allow you to use an image for a list item indicator. You can also select
the positioning of the list item text.
Positioning: The positioning category includes options for absolute and relative
positioning. Absolute positioning defines a specific spot on the page using
coordinates for an element's position. Relative positioning defines a position
relative to the usual positioning of an element.
Extensions: Extensions include options for printing styles, cursor styles, and
filter effects.
Now let's create a style and save it in a style sheet:
Open the HTML page you created earlier in this section.
Type a line of text.
Click the New CSS Style icon at the bottom of the CSS Styles panel to open the
New CSS Style dialog box.
From the dialog box, select Tag from the Selector Type menu, and then choose
h3 from the Tag drop-down menu.
Select New Style Sheet File from the Define in drop-down menu.
Click OK.
The Save Style Sheet As dialog box appears, as shown in Figure 4-4. Choose a
name for your style sheet file and click Save. Style sheet files are saved with
a .css file extension.
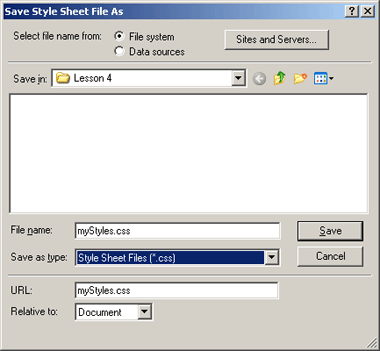
Figure 4-4: Save Style Sheet File As dialog box.
The CSS Style Definition window opens. Choose the options you want for the
Heading 3 style.
Click OK, and then select the line of text and choose Text > Paragraph Format
> Heading 3. The h3 style is automatically applied to the text.
Because you used a tag selector, every h3 element on your page displays with
this style.
Now add one more style to your style sheet:
Click the New CSS Style icon at the bottom of the CSS Styles panel to open
the New CSS Style dialog box.
From the dialog box, select Advanced from the Selector Type menu, and then choose
a:link from the Selector drop-down menu.
Choose the name of the style sheet you created in the preceding steps from the
Define in drop-down menu, and click OK.
In the CSS Styles Definition window, choose the Type category, and then check
the none checkbox under Decoration. Click OK.
Create a hyperlink on your page. This link displays without an underline.
WARNING
If you use links without an underline, be sure it's obvious to the user that
they're links. Most users expect to see those links.
Save the page and the style sheet.
Figure 4-5 shows all three styles as I created them on an HTML page in Netscape
7.
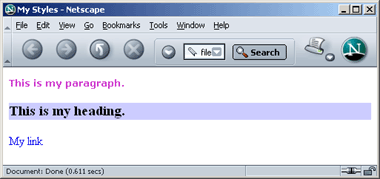
Figure 4-5: Three styles as displayed in Netscape 7.
To attach this style sheet to another HTML page, open the page, and then click
the Attach Style Sheet icon at the bottom of the CSS Styles panel. If you change
any of the styles included in this style sheet, the change automatically applies
to any page linked to this style sheet.
CSS Styles in the text Properties inspector: By default, Dreamweaver MX 2004
automatically creates text styles when you format text, and lets you apply these
styles to other selections of text. The style drop-down menu lists all Dreamweaver-created
styles as well as any additional styles available in attached style sheets.
TIP
CSS styles can be also be accessed and applied from the new Class drop-down
menu available in Dreamweaver's other Properties inspectors.
CSS page properties: The page properties dialog box is expanded in Dreamweaver
MX 2004, and now includes options for CSS-based page properties (such as background
color and font characteristics), link display features, and heading styles.
Relevant CSS panel: The new Relevant CSS panel in the Tag Inspector panel group
displays any CSS rules that have been applied to the current selection. The
top part of the panel displays the applied rules and any affected tags, and
the bottom part displays the details of the applied style rules. You can modify
the rules in the bottom section, and changes are immediately applied to your
document.
TIP
You can also edit Dreamweaver's CSS rules by right-clicking the rule in the
CSS Styles panel and selecting Edit, which opens the CSS Style Definition dialog
box.
Use Dreamweaver's CSS Sample Pages
When you attach an external style sheet to a Dreamweaver page, you can choose
sample style sheets directly from the Attach External Style Sheet dialog box.
This automatically applies the selected style sheet sample to the current page,
and makes it easier than ever to use CSS in your pages.
HTML, XHTML, and XML are all languages derived from SGML (Standardized Generalized Markup Language).
Using XHTML, you can create Web pages that are fully compliant with the W3C (World Wide Web Consortium) standards. Why should you create Web pages that are standards-compliant? By following Web standards, your Web pages will be most likely to display correctly in browsers and to display similarly in different browsers.
Dreamweaver MX 2004 lets you create XHTML documents as your default document type, and also lets you convert pre-existing HTML documents to XHTML documents.
TIP
In the following section, you'll learn how to create XHTML documents in Dreamweaver,
and how to convert HTML documents to XHTML documents.
XHTML is very similar to HTML but it uses the stricter syntax rules of XML -- XHTML is simply a reformulation of HTML using XML syntax. The basic rules of XHTML are the same as these rules for XML syntax:
An XHTML document must contain a root element that contains all the other elements
in the document: The root element for an XHTML document is the <html>
tag. Links to other documents and comments are the only components that can
be outside of the root element container.
Every element must have a closing tag: If you create an XHTML document in Dreamweaver,
it automatically makes sure that it has a closing tag. Empty elements don't
contain any content, so the tag is closed with a closing slash, for example,
<hr />.
Elements must be properly nested: If you open one tag, and then open a second
tag before you close the first one, you must close the second tag before you
close the first one.
TIP
Dreamweaver automatically creates valid XHTML code when you make an XHTML document.
You can double-check by using Dreamweaver's page validation tools, as described
in a later section of this chapter.
All XHTML elements and attributes must be in lowercase: For valid XHTML, element
and attribute names must be in lowercase. Dreamweaver automatically uses lowercase
for element and attribute names when you create XHTML pages.
Even if you're not using XHTML, you'll find it much easier to read your code
if you use lowercase for your tags. You can set your preferences for the case
of your tags by choosing Edit > Preferences > Code Format, and then selecting
<lowercase> from the Default tag case drop-down menu, as shown in Figure
4-6.

Figure 4-6: The Code Format category of the Preferences dialog box.
View a larger version of this image.
All attribute values must be in quotation marks: XHTML requires that all attribute
values be enclosed in quotation marks.
Dreamweaver also automatically applies these additional rules of XHTML syntax
to the XHTML files it creates:
XHTML files are saved with an html file extension.
A DOCTYPE declaration precedes the root element.
TIP
The newer browsers (Internet Explorer 6 and higher, and Netscape 6 and higher)
display pages differently according to whether a DOCTYPE is included, and which
DOCTYPE is used.
To choose XHTML as your default preference, follow these steps:
Select Edit > Preferences > New Document.
Check the Make document XHTML compliant checkbox, as shown in Figure 4-7.

Figure 4-7: Setting New Document options in the Preferences window.
View a larger version of this image.
Click OK to save your selections, which are automatically applied the next
time you create a document.
To create an XHTML document without making it your default document type:
Create a new document by choosing File > New from the main Dreamweaver application
window.
In the New Document dialog box, shown in Figure 4-8, choose Basic page from
the Category list and HTML from the Basic page list.
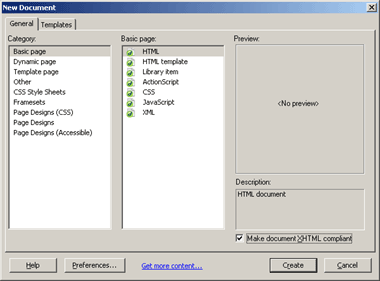
Figure 4-8: Choosing an XHTML page in the General tab of the New Document dialog box.
View a larger version of this image.
Check Make document XHTML compliant checkbox in the lower-right corner.
Click OK to create the document.
To convert an HTML document to an XHTML document:
Open an HTML document in Dreamweaver.
Select File > Convert > XHTML from the main Dreamweaver application window.
Dreamweaver then automatically adds the appropriate code to convert the document
to XHTML.
Save the document to preserve the changes.
Dreamweaver uses the DOCTYPE declaration to select the validation rules for your document. Because all XHTML document are required to have a DOCTYPE, Dreamweaver automatically knows which type of document to validate your page against.
TIP
If you aren't using a DOCTYPE for a page that you want to validate, just choose
Edit > Preferences and check the box before any validation options you wish
to use.
To validate an XHTML document, follow these steps:
Open the XHTML page in Dreamweaver.
Select File > Check Page > Validate Markup from the main Dreamweaver application
window.
View the results of validation in the Validation panel of the Results panel
group. Figure 4-9 shows the validation message that displays if there are no
validation errors in your page. (If the Results panel is not showing at the
bottom of the Dreamweaver workspace, select Window > Results.)
If the Validation panel lists any errors, double-click the error message to
highlight the error in the document window and fix it.
Moving On
In this lesson, you learned how to use CSS and XHTML in Dreamweaver to create Web standards-compliant pages. You also learned how to validate those pages. In Lesson 5, you'll learn how to add images, multimedia files, and Dreamweaver's built-in JavaScript behaviors to your pages.
Before you move on, do the assignment and the quiz for this lesson. In addition,
visit the Message Board to find out what your fellow students and instructor
are up to.