Once your folder structure is in place, the next step is to create the files. There are a few things to keep in mind when you name the files:
Use meaningful filenames.
Use all lowercase characters.
Include the file extension (.html, .gif, and so on).
Use underscore (_) instead of spaces (spaces cause problems on the Internet).
Suffix working filenames with a two-digit number as shown below. This ensures
different versions of the same file are ordered numerically in a directory listing.
When you're done with the file, remove the suffix to indicate the final version,
for example:
myfile_01.html
myfile_02.html
myfile_03.html
myfile.html
The myfile.html file is your final version.
So to start your Web site, create three HTML pages and save them with these
three filenames: index.html, about.html, and contact.html. Add a background
color to each page, and then save the files in your site folder.
TIP
A Web site home page is usually named index.html, and is the default page that
displays when a user types in your domain name in a browser.
To create a Dreamweaver site, follow these steps:
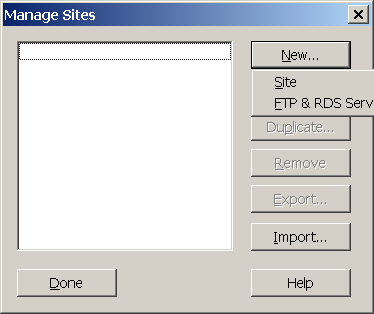
From the main Dreamweaver application menu, choose Site > Manage Sites, and then choose New > Site from the Manage Sites window, as shown in Figure 6-1.
Figure 6-1: The Manage Sites dialog box.
The Site Definition window opens. If you've never created a site before, the Basic tab appears with a Site Definition wizard. Instead of adding a site using the Wizard, click the Advanced tab and select the Local Info category, as shown in Figure 6-2.
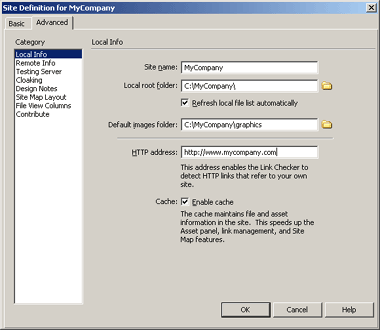
Figure 6-2: The Local Info category of the Site Definition for MyCompany dialog box.
View a larger version of this image.
Enter your site name in the Site name text box.
Click the folder icon to the right of the Local root folder box and browse to
the location of your Web site's folder. Click Open, and then Select to choose
this folder.
Click the folder icon to the right of the Default images folder and browse to
the location of the images folder inside your Web site folder. This enables
Dreamweaver to open this folder by default when you insert images on your Dreamweaver
pages. Click Open, and then Select to choose this folder.
If you have one, enter your domain address in the HTTP address box. If you don't,
just leave it blank.
Leave the window open. You'll use the Remote Info category in the next section.
TIP
There are free Web servers available, usually with banner advertising. They're
great for practicing your skills and posting example sites. Two of our favorites
are brinkster.com and netfirms.com.
You need to know these four things from your Web hosting company or ISP (Internet Service Provider):
FTP host name
Host directory (if there is one)
User name
Password
In the Remote Info category, choose FTP from the Access drop-down menu, and
then follow these steps:
Enter the FTP host name.
Enter the host directory name, if there is one.
Enter your user name in the Login box.
Enter your password. Click the Test button to make sure your user name and password
work. Example entries are shown in Figure 6-3.
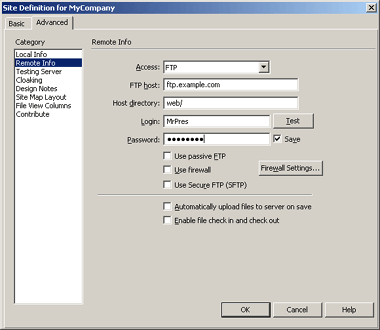
Figure 6-3: The Remote Info category of the Site Definition for MyCompany window.
View a larger version of this image.
Enter any of the other settings you need to.
Click OK to close this box, and then click Done in the Manage Sites window.
TIP
If you're connecting to an existing Web site, Dreamweaver scans all of the files
in the site. This could take a while if the existing Web site has a lot of files.
Now you can upload your files from Dreamweaver to your domain on a Web server. Open the Files panel in your Dreamweaver workspace, as shown in Figure 6-4.
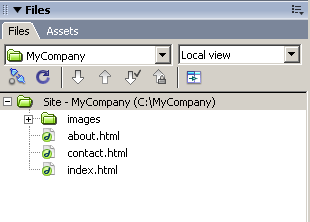
Figure 6-4: The Files panel of the MyCompany site.
The toolbar at the top of the panel enables you to use FTP to upload and download files from a remote Web server. From left to right, the tools are as follows:
Remote host connection: Opens a connection with your remote host.
Refresh: Refreshes your files list after any changes.
Get Files: Downloads files from a remote Web server.
Put Files: Uploads files to a remote Web server.
Check Out Files: Marks a file as checked out to you (if you have enabled CheckIn/CheckOut
in the Remote Info category).
Check In: Checks the file back in.
Expand/Collapse: Lets you view remote and local files in the same window.
If you have a Web host on a remote server and have set up the Remote Info panel,
select the site files, and then click the Put Files icon to upload your files
to the Web server.
In the drop-down menu to the right of the Site name drop-down menu, choose Map view. If you have specified a home page, Dreamweaver can create a map of your site. Click the Expand/Collapse icon in the Panel toolbar to view both the map and the files, as shown in Figure 6-5.
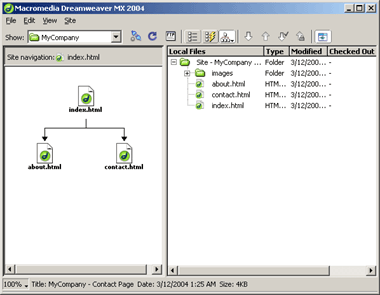
Figure 6-5: Expanded view of site map and files.
View a larger version of this image.
We added the navigation bar from the previous lesson to each of the site pages to create links between the pages. Those links are shown in the site map. Click the Expand/Collapse icon again to return to normal view.
On the right side of the Files panel is an icon to open the drop-down menu shown in Figure 6-6. You can use this menu to access basic file and site procedures.
Figure 6-6: Drop-down menu from the Files panel.
You use this menu in the next section to access the Synchronize command.
Dreamweaver MX 2004 allows you to FTP without creating a Dreamweaver site.
You won't be able to use Dreamweaver's site management features if you don't
create a Dreamweaver site, however. To FTP without creating a Dreamweaver site,
from the Files menu, choose Files > Site > Manage Sites, and then choose
New > FTP & RDS Server. Enter your FTP settings in the Configure Server
window.
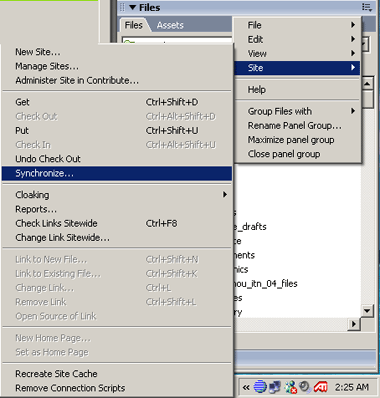
Figure 6-7: Synchronize on the Site menu.
View a larger version of this image.
You can choose Selected Local Files Only, as shown in Figure 6-8, or the entire site files. You can get files from the remote server (download), put files on the remote server (upload), or both. Make a selection from the Direction drop-down menu. Click Preview to review the files before they're copied and moved.
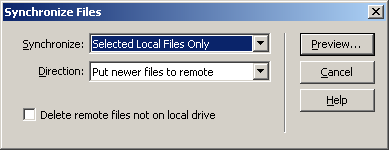
Figure 6-8: The Synchronize Files dialog box.
To check the HTML and accessibility features in your site, choose Site > Reports. The Reports dialog box opens. Choose Entire Current Local Site from the Report drop-down menu, as shown in Figure 6-9. Click the options you want to check in the HTML reports section of the window, and then click Run.

Figure 6-9: The Reports dialog box with Entire Current Local Site selected.
The results display in the Site Reports panel in the Results panel group, shown in Figure 6-10.

Figure 6-10: The Site Reports tab.
View a larger version of this image.
Open the drop-down menu from the right of the Files panel group and choose Site > Check Links Sitewide to generate a report of any broken links in your site files. The results display in the Link Checker panel in the Results panel group, as shown in Figure 6-11.
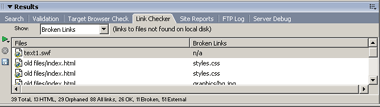
Figure 6-11: The Link Checker tab.
View a larger version of this image.
Moving On
In this lesson, you learned how to create a Dreamweaver site and upload and download files from a remote Web server. This is the final lesson in this course. You've learned all the basic features of Dreamweaver MX 2004, and can now start creating files and sites in Dreamweaver.
Before you move on and start building your own Web sites, do the assignment
and the quiz for this lesson. In addition, visit the Message Board to find out
what your fellow students and instructor are up to.